


You would want to change the door sills of your Ferrari F355 for several reasons. First of all because they are damaged. The rubber used by Ferrari may have aged badly, water may have infiltrated and your door sills may then rust from below: deal with it before it's too late! Then you can do it for aesthetic reasons. The rubber used for the "Ferrari" logo is cheap, carbon door sills will match better with your carbon bucket seats, if your Ferrari F355 has them, and take on the style of the Ferrari F355 Fiorano kit.
Where to find your door sills for Ferrari F355 and above all how to install them correctly? Is it a complicated operation, before you embark on this project? What does this actually consist of? @ferdi_ has just done it on his superb Ferrari F355 and details 4 simple steps to change the door sills of your Ferrari F355.
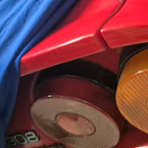
BEFORE

AFTER

Step 1: Materials neede
- A Ferrari F355, well yes, without it will be complicated!
- A spatula
- A cutter
- A heat gun
- A Phillips screwdriver
- A product to remove rust
- A roll of double-sided tape
- A little glue
- Elbow grease, not a lot but enough, we will see later...

Of course, you also need door sills! Carbon door sills for Ferrari F355 are available in several places, at different prices and quality. The most important in the choice of these is the mesh of the carbon fiber.
I found mine here: https://www.shineautoproject.com/portfolio/ferrari-f355/
Ken, the owner of this company is well known in the Ferrari world. He even owns, among other things, two very beautiful Ferrari F355s. He is American and actively participates on the appropriate forum ending in chat.
A bit pricey it's true, but the quality is felt and there are no rough edges for adjustments. Don't forget to ask him about the availability of the aluminum "Ferrari" script. This is a fairly rare part and not always distributed by known spare parts suppliers.
Step 2: Remove the screws from the old door sill
Identify the threshold! It's not complicated, there are two like dad...one on the right, the other on the left. In order to avoid being repetitive, we will concentrate on a single threshold. It will obviously be necessary to practice in the same way on the left or right one, it all depends on which one you start! lol
Well then you tell me... I start with the one on the left!

It would be better to turn off the battery at the circuit breaker, you will work a good time with the door open, although the light on the edge of the door will not drain your battery
The threshold is held by 4 screws, and glued wildly, or not ... 3 screws are easily spotted, under the rubber seal, the 4th a little less. It is located under the tab in Ferrari script, here (see photo above). You understand, you will first have to unscrew them. Keep them with their washer, they will serve you later.
Step 3: Remove the old door sills from your Ferrari F35
Then, using a heat gun and a spatula, you will slide it slowly but firmly between the chassis of the car and the old sill while heating it with the gun. Go gradually, there's no point in rushing, the point of the exercise is not to destroy the old threshold.

I forgot to tell you, before any attempt to take off ... protect your paint, especially the painted edge. You will see it in the photos. The perforated plates are not necessary, but very practical. I used them to gradually advance the intervals once the threshold lifted off. Simple way to prevent the sill from sticking together.

You should end up with this:

Then take a cutter and remove the mounds of glue, so as to flatten the surface. You may find some rust, especially around the 4th screw, which I did. Take the opportunity to treat rust, with a product such as this

Clean, vacuum, degrease as much as possible! Your surface must be as clean and smooth as possible... Indeed your carbon threshold will not appreciate the differences in thickness and could structurally break on a simple pressure.

Congratulations, you have successfully removed the old door sill from your Ferrari F355!


It is in immaculate condition, because you have been progressive in the task and you have endeavored not to bend it but to play with the spatula!


Step 4: Glue the new door sills of your Ferrari F35
The simplest, the most trivial...
You will notice that on the old sills, you have a rubber lip, peel it off, and stick it on the new one. This lip allows the possible flow of rain, it is necessarily useful. There she is:

Then glue double-sided, not too thick, on the back of your new threshold, and affix sparingly small mounds of glue. Just enough to make contact...

Mark with tape your mounting holes. This will allow you to locate them once your threshold is placed under the rubber seal

There you go, you put everything back where mom was supposed to welcome dad... and find, with the means at hand, something to put pressure on for a few hours, the time it takes for everything to take

You can replace the 3 screws under the seal. You are done, you should get this result

Pretty cool, no?

Now gently close the door of your Ferrari F355, hoping it closes and doesn't come and sabotage your work! Lol!

Bonus:
I for my part asked a company to cover my thresholds with a PPF Xpel in order to avoid any scratches caused by the soles of shoes. Indeed this material regenerates! Lol!

Are you planning to change the door sills of your Ferrari F355? Do you have a recommended Ferrari F355 door sill supplier? What would be your advice for installing Ferrari F355 door sills?
If you liked this article, you may also like:
- Ferrari 458 and Ferrari 488 brake recall campaign
- Where should you have your Ferrari serviced?
- Ferrari 308 and 328 buying guide : the various versions (1/3)
- Tighten the leather of the airbag of your Ferrari in 5 steps by PhilM


Rejoindre la conversation
Vous pouvez publier maintenant et vous inscrire plus tard. Si vous avez un compte, connectez-vous maintenant pour publier avec votre compte.